
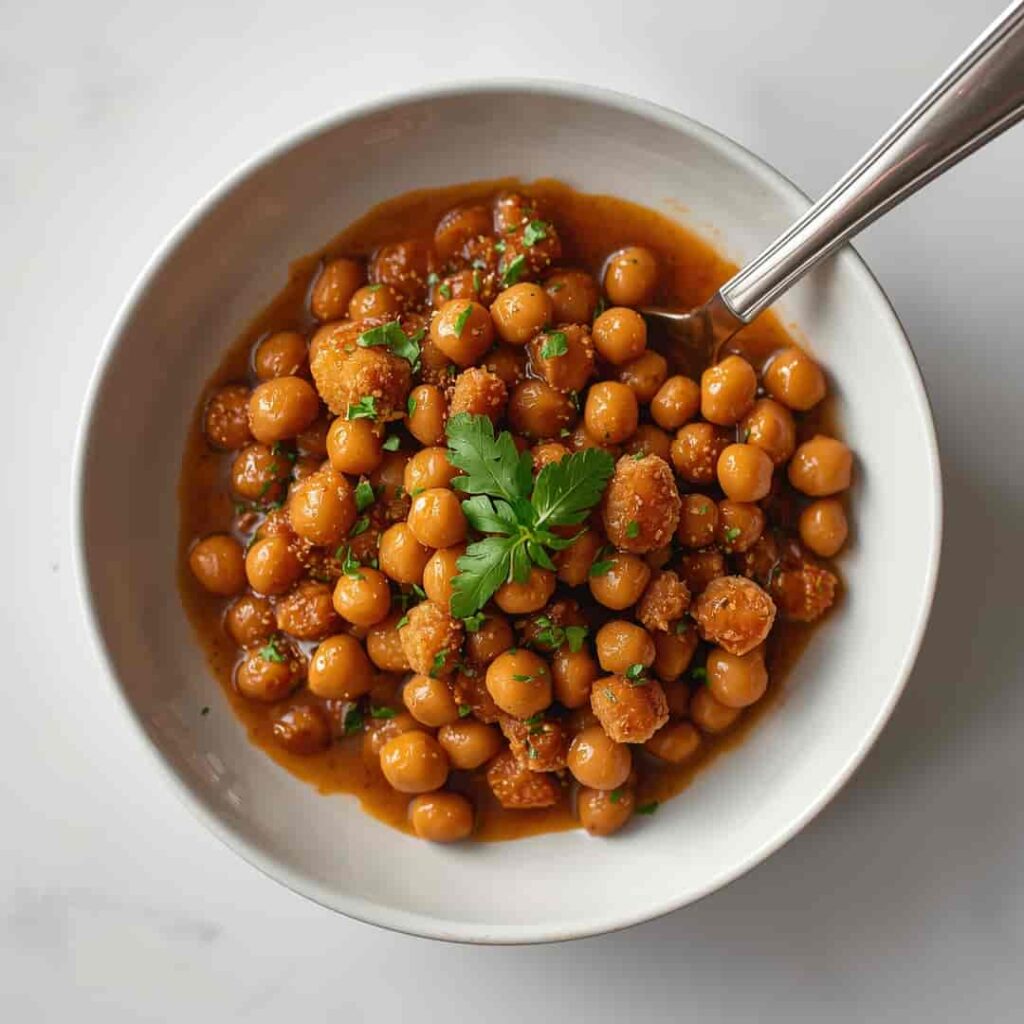
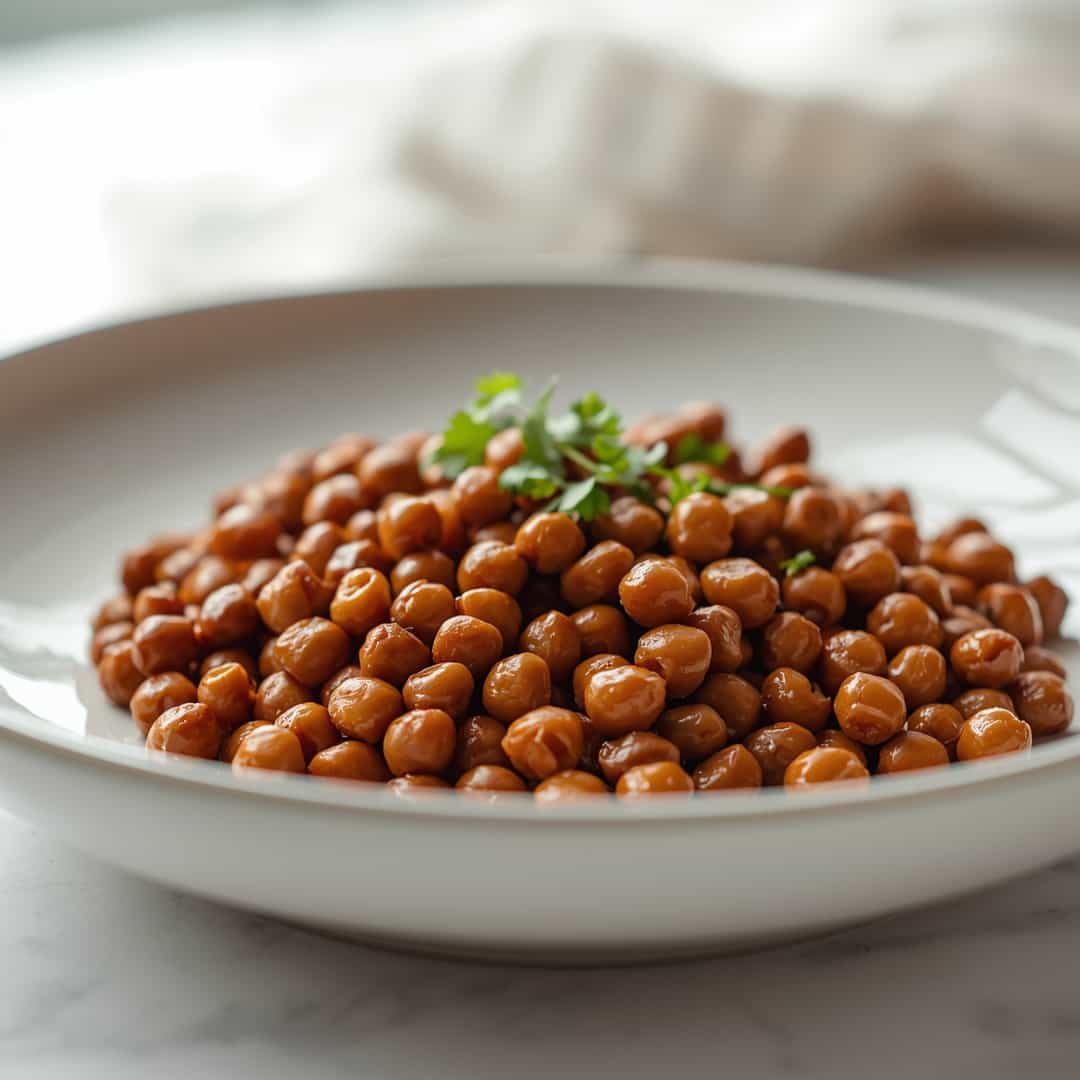
Welcome, food lovers! Today, we’re diving into the heart of Southern comfort with a dish that’s as versatile as it is delicious: pan-fried black eyed peas. This recipe transforms humble black eyed peas into a crispy, savory, and incredibly satisfying side dish or a light, wholesome main. If you’ve ever thought black eyed peas were just for New Year’s Day, prepare to have your mind (and taste buds) blown! This dish is a fantastic way to enjoy the earthy goodness of black eyed peas with a delightful textural twist, making it perfect for any meal, any time of year, and an absolute must for your culinary repertoire. We’re about to make these legumes shine like never before!
Key Ingredients for Pan-Fried Black Eyed Peas
To embark on this delightful culinary journey, gather these simple yet essential ingredients:
- 2 cups cooked black eyed peas, drained (about 1 ½ cups dried peas, cooked according to package directions, or 2 cans, rinsed and drained) – The star of our show, providing a hearty base and earthy flavor.
- 2 tablespoons olive oil (or your preferred cooking oil) – For achieving that perfect golden crispness.
- ½ cup finely diced yellow onion (approximately ½ medium onion) – Adds a foundational aromatic sweetness.
- ¼ cup finely diced red bell pepper (about ½ small pepper) – Contributes a vibrant color and a mild, sweet pepper flavor.
- 2 cloves garlic, minced – Essential for a pungent, savory depth.
- ½ teaspoon smoked paprika – Provides a warm, smoky aroma and a touch of color.
- ¼ teaspoon cayenne pepper (optional, modify to taste) – For a subtle kick of heat that elevates the flavors.
- ½ teaspoon dried thyme – Adds an earthy, slightly minty note that complements the black eyed peas beautifully.
- Salt and freshly ground black pepper to taste – To enhance and balance all the flavors.
- 2 tablespoons fresh parsley, chopped (for garnish, optional) – A sprinkle of freshness and a pop of green.
- 1 tablespoon apple cider vinegar (optional, for a bright finish) – A secret ingredient to add a touch of acidity and brighten the dish.
How to Make Pan-Fried Black Eyed Peas
Get ready to discover how incredibly easy, delicious, and satisfying this pan-fried black eyed peas recipe truly is! In under 30 minutes, you’ll transform simple pantry staples into a dish bursting with savory, smoky, and slightly spicy notes, all brought together with a delightful crispy texture from the pan-frying. Its simplicity makes it a weeknight hero, while its robust flavor profile ensures it’s a crowd-pleaser, delivering wholesome goodness with every bite. The perfect quick fix that doesn’t compromise on taste!
● Step-by-Step Instructions:
- Prepare the Black Eyed Peas: If using dried black eyed peas, cook them according to package directions until tender but not mushy. Drain thoroughly. If using canned black eyed peas, rinse them well under cold water and drain them completely. Excess moisture is the enemy of crispiness, so make sure they are as dry as possible. You can even pat them lightly with a paper towel.
- Sauté Aromatics: Heat the olive oil in a large non-stick skillet or cast-iron pan over medium heat. Once shimmering, add the finely diced yellow onion and red bell pepper. Sauté for 5-7 minutes, stirring occasionally, until the vegetables have softened and become translucent.
- Add Garlic and Spices: Stir in the minced garlic, smoked paprika, cayenne pepper (if using), and dried thyme. Cook for another minute, stirring constantly, until the garlic is fragrant. Be careful not to burn the garlic.
- Introduce the Peas: Add the drained black eyed peas to the skillet with the sautéed aromatics. Gently stir to combine, ensuring the peas are evenly coated with the spices and vegetables.
- Pan-Fry to Perfection: Spread the black eyed peas in an even layer across the bottom of the skillet. Increase the heat slightly to medium-high. Let the peas cook undisturbed for 5-7 minutes, allowing them to develop a golden-brown crust on the bottom. Don’t stir too frequently; resist the urge! This is crucial for achieving that delightful crisp texture.
- Flip and Finish: After the initial crisping, gently stir and flip the peas to expose different sides to the hot pan. Continue to cook for another 5-7 minutes, stirring occasionally, until the black eyed peas are nicely browned and crispy all over.
- Season and Brighten: Remove the skillet from the heat. Season generously with salt and freshly ground black pepper to taste. If desired, stir in the apple cider vinegar now for a touch of brightness that cuts through the richness.
- Garnish and Serve: Transfer the pan-fried black eyed peas to a serving dish. Garnish with fresh chopped parsley, if using. Serve immediately and enjoy the irresistible flavors and textures!
Ingredients
Equipment
Method
- Combine the water, yeast and sugar in a bowl. Rest for 5 minutes.pan fried black eyed peas1 cup water, 1 tsp instant yeast, 1 tsp sugar
- Combine the flour and salt.2 cups all-purpose flour, 1 tsp salt
- Add the yeast mixture and knead until you get a soft ball.
- Place in a bowl and cover. Let rise for 30 minutes.
- Divide the dough and form pizzas.
- Top the pizzas with sauce and vegetables, cook for 15 minutes on the pizza stone.pan fried black eyed peasred sauce, 1/4 red onion, 1/4 green pepper, 1/4 red pepper, rosemary
Notes
Why You’ll Love This Pan-Fried Black Eyed Peas Recipe
You are absolutely going to adore this pan-fried black eyed peas recipe because it truly elevates a humble legume into a star! The main highlight is undoubtedly the incredible combination of crispy edges and tender interiors, creating a textural masterpiece that’s hard to resist. Not only is this dish incredibly satisfying, but it’s also a fantastic way to save money, utilizing affordable pantry staples to create a gourmet-tasting meal right in your own kitchen – farewell, expensive takeout, hello delicious homemade goodness! The secret to its undeniable allure lies in the flavorful combination of smoked paprika, a hint of cayenne, and the brightness of apple cider vinegar, which infuse every pea with a depth of flavor that’s both comforting and exciting.
This pan-fried version offers a delightful contrast to traditional creamy black eyed pea recipes, proving that these versatile legumes can take on many delicious forms. If you’re a fan of our spicy roasted chickpeas, you’ll find a similar satisfying crunch and bold flavor profile here, encouraging you to explore more of our easy-to-make, flavor-packed dishes. So, why wait? Give this pan-fried black eyed peas recipe a try tonight and discover a new favorite that’s both economical and exquisitely flavorful – your taste buds will thank you!
What to Serve Pan-Fried Black Eyed Peas With
Pan-fried black eyed peas are wonderfully versatile and can complement a wide array of dishes. Here are a few ideas to create a balanced and delicious meal:
- As a Hearty Side: They pair beautifully with classic Southern dishes like collard greens, cornbread, or oven-fried chicken. The crispiness offers a delightful contrast to softer textures.
- With Grilled Meats: Serve alongside grilled pork chops, steak, or a simple grilled chicken breast. The smoky notes of the peas will harmonize perfectly with the char from the grill.
- In a Bowl: Make it a meal by adding them to a grain bowl with quinoa or brown rice, topped with avocado, a fried egg, and a drizzle of hot sauce.
- Taco/Burrito Filling: These flavorful peas make an excellent vegetarian filling for tacos, burritos, or even quesadillas.
- Alongside Seafood: Believe it or not, they can be a fantastic accompaniment to pan-seared fish like cod or snapper, offering a rustic, comforting element.
Top Tips for Perfecting Pan-Fried Black Eyed Peas
Achieving perfectly crispy and flavorful pan-fried black eyed peas isn’t difficult, but a few key tips can elevate your dish from good to extraordinary:
- Dryness is Key: This is perhaps the most critical tip. Whether you’re using canned or pre-cooked black eyed peas, ensure they are thoroughly drained and as dry as possible. Excess moisture will steam the peas instead of frying them, preventing that coveted crispy exterior. Pat them with paper towels if needed.
- Don’t Crowd the Pan: Overcrowding the skillet will lower the pan’s temperature and lead to steaming rather than frying. Cook the peas in a single layer, or in batches if necessary, to ensure each pea has enough direct contact with the hot surface to crisp up.
- Use the Right Pan: A large, heavy-bottomed skillet, preferably cast iron, is ideal. Cast iron retains heat exceptionally well, promoting even browning and crispiness. A good quality non-stick pan will also work, but cast iron gives superior results.
- Resist Frequent Stirring: When you first add the peas to the hot pan, allow them to cook undisturbed for several minutes. This gives them time to develop a crust on the bottom. Once you see golden-brown spots, then gently stir and flip. This patience is crucial for maximum crispness.
- Flavor Boosters: Don’t be shy with your seasonings. A good pinch of salt is essential. Consider adding a squeeze of lime or lemon juice, or a splash of apple cider vinegar at the very end to brighten the flavors and cut through the richness.
- Common Mistakes to Avoid:
- Under-cooking the peas initially: If starting with dried peas, ensure they are fully cooked and tender before frying. Hard peas won’t crisp up nicely.
- Not enough oil: While you don’t want to deep-fry, a generous amount of oil (enough to lightly coat the bottom of the pan) is necessary for proper browning and flavor development.
- Low heat: If the heat is too low, the peas will just warm up instead of crisping. Maintain a medium-high heat.
Storing and Reheating Tips
While pan-fried black eyed peas are best enjoyed fresh and crispy, you can certainly store and reheat them with a few considerations:
- Storage: Allow the pan-fried black eyed peas to cool completely to room temperature before storing. Place them in an airtight container and refrigerate for up to 3-4 days. Storing them while still warm can create condensation, making them soggy.
- Reheating for Optimal Taste: To regain some of their crispiness, the best way to reheat pan-fried black eyed peas is in a dry skillet over medium-high heat. Spread them in a single layer and cook, stirring occasionally, until heated through and starting to crisp again. Alternatively, you can reheat them in an air fryer at 350°F (175°C) for 5-7 minutes, shaking halfway.
- Microwave Reheating: While possible, microwaving will make the peas lose most of their crisp texture. If you’re not concerned about crispiness, microwave in short bursts, stirring in between, until heated through.
- Freezing: Freezing pan-fried black eyed peas is an option, but be aware that they will lose their crispy texture upon thawing and reheating. If you wish to freeze them, cool completely and transfer to a freezer-safe bag or container. They can be frozen for up to 3 months. To reheat from frozen, thaw overnight in the refrigerator, then follow the skillet or air fryer reheating instructions for best results. Be prepared for a softer texture.
Final Thoughts
And there you have it – a truly delightful and incredibly versatile dish that breathes new life into the humble black eyed pea! This pan-fried black eyed peas recipe is a testament to how simple ingredients, combined with a clever cooking technique, can create something truly extraordinary. Whether you’re looking for a quick weeknight side, a healthy lunch, or a flavorful addition to your holiday spread, these crispy, savory peas are guaranteed to impress. So go ahead, whip up a batch, and savor the comforting flavors and satisfying crunch that make this recipe an instant favorite. Happy cooking, and don’t forget to share your pan-fried pea creations with us!
Ready to start cooking? Explore hundreds of delicious recipes now, and for daily inspiration and curated food ideas, follow us on Pinterest!